Thursday, December 30, 2010

How to make animation in Photoshop CS3

As you make your blog , you want visitors to visit your blog . it is  necessary for you to use different techniques to attract the  visitors. One method that is used to attract visitors is the animation . The animation allows you to inject movement into web page  to draw the attention of the viewer. There are many software programs available that allow the creation of animation. One such program is Adobe Photoshop Creative Suite 3 (CS3), which will be used for my method. It is important to note that this method requires basic knowledge of Photoshop CS3, but actually I have no knowledge of CS3. Along with my experience , I got the Photoshop software and try myself. Now I have a little bit of my experience in making animation in CS3 and I  take only images to make animation. Please look at the step below. This is the easy way with my no knowledge experience of Adobe Photoshop Cs3:
  • You must have Adobe Photoshop Creative Suite 3 (CS3) installing on your computer;
  • After installing has finished , open your Adobe Photoshop CS3;
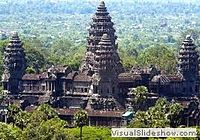
  •  Point to File tab on the task bar of Adobe Photoshop CS3 , select open to open image from your Computer ( the image which you like to show ). The image Height or width in Pixel or inch , it is up to you to select to display in your blog , big or small .See my image , I opened one image named "blog logo1"
  • The size of your image open above is up to you to select it;
  • Look at the right side of your CS3 , your will see the layer palette , click on 'create a new layer' 3 times , so I get 3 layers with one background eg: layer 1, layer 2 and layer 3. ( This means that I want to display 3 images in my animation with the same background of my layers).
  • After clicking on 'Create a new layer' 3 times you got the image as below:
  • Right click on the layer 1 and select 'Convert to smart object', and follow these steps until layer 3. Look at the picture , it has changed :
  • Select on the layer that you have converted to smart object again. By right click on the smart object layer (1,2,3) to replace the content. At this time I want to replace the images from my computer to layer 1, layer 2 and layer 3.
  • Right click on smart object layer 1, select 'Replace Contents', so you have to select the image from your computer to replace the layer 1. Do this method until layer 3. If you want to replace the background you ought to do the same method in this step or above step.
  • Point Window task bar of CS3 and select 'Animation'; you get
  • Select on 'Duplicates  selected frame', click 3 times , you get as above image ( 4 frame).
  • Look at the layer palette and point to the eye icon , select unchecked 'eye botton' from layer 1 to 3 if you want to keep frame 1 as the background at the layer palette . Do this method until  frame 4.
  • Select frame delay time at your frame ( to give seconds to the image for displaying time)  and if you want the loop displays forever , select 'forever' .
  • After finishing at your frame , it is time to save your images animation.Go to File tab at CS3 , select 'Save for Web and Device', select type file 'GIF'. and click Done.
  • Save your file name and select extension Gif 'Images Only(*.gif).
  • Select 'insert image' at your post to insert your animation file.My example below , I do not upload the file ; I only use 'insert image'.
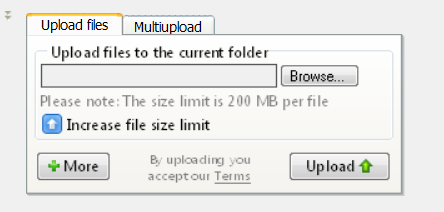
  •  if you want to upload :
    • Upload your file that you save above to the file hosting web page.
    • Get your html code to paste in your blog. See the previous step How to upload file to file hosting and get the html code to paste in your blog.


Monday, December 27, 2010

How to make animation

 It is nearly the same between slideshow and Animation in displaying . In the previous tutorial I have introduced you How to make slideshow . I have shown you to make slideshow on free slideshow web page as http://www.slide.com/ but actually we can make slideshow by other methods as PowerPoint , photoshop ...ect.
At this time we mention about animation (animation gif) .Animation you can make cartoon , movie ...It displays like slideshow.Animated files are always consisted of files with extension GIF (Graphics interchange format ). I have a little of IT , so I only summarize How to make animation. There are 2 was to make Animation :
  1.  Online animation ;
  2. Offline animation .
  • 1- Online animation : You can make your animation on free online animation as text , as images , part of word or part of images ....Some free online animation , you can only add text to make animation ,some you can add images and some free online animation you can add text and images to make animation .One free animation onle is http://www.animationonline.com/ that you can add text to animate .
  • First you have to sign up your account;
  • Follow the instruction;
  • Fill the text , select loop , loop period of time , background you like , text color , text format ......;
  • Click save , give the name of your saving file ( if you are not yet to sign up , they ask you to sign up afterward you can save your file ).
  • Click on Publish and copy the html code to paste in your new post or in your Gadget. After clicking on Publish tab see the picture below :  


  • 2- Offline animation : Means that you can make animation by any software as slideshow visual , photshop and the popular software to make animation is PhotoShop .If you are expert with Photoshop , please make it with photoshop .Remember that if you animation with Photoshop software you have to upload your animated files to file hosting in case you want get the html code to paste in your Gadget's blog . In  case you only want to insert animation to your new post , you ought to use Insert Image on your task bar of your new post ; no need to upload your file to file hosting web page ; it is simple way and it does not spend more time to upload .Look at my animated images below , I've used Insert image at my task bar of new post.


This is the example that I got the htnl code from http://www.animationonline.com/


How to make slideshow

There are a lot of free slide show web pages and some web pages , you are charged for them . Now I introduce one web page for free of charge for you that is http://www.slide.com/ .Let's go with this web page :
  • Go to  www.slide.com ;
  • Sign up your account (Register with http://www.slide.com/ ) ;
  • Fill your valid email address and password ;
  • Assume you got one account at http://www.slide.com/ ;
  • Sign in your account ;
  • Select create tab and choose create a slideshow ;
  • Select your style and skin ( to display your slideshow with your own style which you like );
  • Find the words Add the Images from ;

  • In this step you can choose images from many sources ( on the left bar ) but I recommend you to select from your Computer by clicking on Browse tab and select the images that you love.
  • Click on upload button to upload your images;
  • When the uploading is finished , find the html code and copy it to paste in your text editor or Notepad.
  • Check out http://www.slide.com/ or keep to do more , it's up to you .
The step to insert html code to your blog : There are two way to insert your slideshow html code to your blog:
  1. To display your slideshow in your new post :
  • Paste your slideshow html code that you saved in your Notepad in your new post in which anywhere you like ( at the header , center , left , right or bottom of your text )


      2 - To display your slideshow in your Gadget of your blog: To display in anywhere according to your template ( 1 column , 2 column , 3 column ...magazin template ect. , so you can place your slideshow Gadget at the Header , left side , right side , bottom , ...up to you which you like).
  • Log in your blogger with your account ;
  • Go to your Dashboard and click on Design tab
  • Find Page Element , select Add a Gadget ( According to your style Gadget template , so you have to place your html code (slideshow code saved in Notepad)

  • After clicking on Add a Gadget  , go to html/Javascript code and select Plus sign + to add your html code (slideshow code).see the image :

After you add your html code and save it ,you can edit or change the place and more . Try yourself step by step.

Sunday, December 26, 2010

How to upload image to file hosting

Actually there are many  free file hosting web pages that you can upload your images but this time I take one web page only eg: http://www.4shared.com/ to   upload the images . I assume that you have 4shared account .Please sign in your 4shared account :
  • Click on Browse and find the images from your computer and select it afterward click on upload. Wait a while according to your image size .After your uploading has finished , you will get some link .
  • Copy and paste the link to your blog ( if you want the image to display in your post , paste the code in your post . If you want the image to display in Gadget , paste in Gadget by clicking on Add a Gadget and select plus sign with HTML/ Javascript code and click on save button. See the image below:

Now I want to display my image in this area post and I got the html code from my 4shared account like this :

<a href="http://www.4shared.com/photo/g1govxvV/4_online.html" style="clear: left; cssfloat: left; float: left; margin-bottom: 1em; margin-right: 1em;" target="_blank"><img border="0" src="http://dc268.4shared.com/img/g1govxvV/4_online.jpg" /></a></div>
  •  When I paste the above html code in the below area of my post , I get the result like this ( the image is displayed).
Note : If in the simple way to upload your image with your post , you only use the insert button at your post bar that you can insert image or video file to your new post as previous post that I showed you How to post something to your post. In this way that you use file hosting web page to store your images to use with other new post and you don't want to waste the time to upload one image again and again .

How to get the URL , HTML code and Forum code to link to your blog


At the previous step you have known about uploading the files to 4shared.com , now you want to get the URL , HTML code and forum code to paste in your free blog.
  • I assumed that you had uploaded one file to your 4sharde account. (For my example I have uploaded one image to my 4shared account ).

  • Log in to your 4shared account with your ID (mail address and password ).
  • Select a file that you want to get the link ( as URL , HTML code or forum code ) by clicking on it or clicking on Download button ,you will get some images as below :

You want visitors to download your file at your blog from your 4shared.com by the link in your blog.( you have already known about how to link to another site at my previous post .I give you my own example I want visitors download my Angkor image from my post that I have uploaded at my 4shared account .This is the example that I posted to invite visitors to download my image.Please download Angkor image from here.The URL I got from my 4shared account that I copied from the link to paste with here word is http://www.4shared.com/photo/ePhjMBJZ/image-test.html .see the picture with draw rectangle :


Saturday, December 25, 2010

How to Log in and upload files at 4sharded.com

At the previous tutorial , I suppose you had made the 4shared account successfully . In this tutorial method , I show you how to log in and upload your files at 4shared.com:
  • Go to http://www.4shared.com/ and find the button Log in , click on it to sign in with your ID (mail address , password).
After you sign in your account , you  reach to your account so you ought to manage your account as folder names in which you want to place your files.For example I make one folder named MP3 , so I will upload mp3 file to this folder (MP3).Now let's go to upload files from your PC :
Find the upload button , click on browse and select the file from your PC to which you want to upload .If you want to upload more than one file , click on +More  .Remember you can upload only 200MB per upload but by my experience you have to upload every small size and use many times to upload.After select your file , click on Upload button (see the picture ).When your upload Done , it gives you a link for linking to your blog or link to something else that you want . It gives you HTLM code for copying to paste in your Gadget Javascript of your free blog , share to ..ect.
Note: At this file hosting, the advantage of uploading files it is not only for blog purpose ; it is also for keeping your files on Internet and share to the world ( not secret files ).Sometimes my files are uploaded to file hosting because I don't want to keep in my PC and I am afraid of virus to destroy my files.

How to upload files to file hosting web

Now you want to upload files to file hosting webpages. You can upload any file to file hosting webs with free of charge or with charge according to selected webpages.At this tutorial I introduce you one file hosting homepage that you can Upload, access, share your music, video, photos is http://www.4shared.com/ .
At the http://www.4shared.com/ it gives you 10GB of free space for free of charge .If you want to use over 10GB of free space , you have to pay by using premium .
You must sign up (create ) your 4shared account for free .The steps to create your 4shared account :
  • Go to http://www.4shared.com/ , click on Sign up button .See the image:
  • After fill out the instruction such as your email address , password , confirm your password and select your plan .Will you use free or premium ? and give a click on it . See the picture : 


How to upload some documents to your free blog.

You can make your free blog and you don't want to pay any charge to file hosting websites and you want to keep some documents as from word , excel , PDF files in your free blog.
You have already known in your post , you can only upload  video files and images (for images , you can upload JPG, GIF, or PNG files.) Sometime you got attachment files from your mail as PDF files , and you want to upload these files to your free blog. It is easy to do this. Follow the step below:
  • Open your PDF file and save it as JPG or PNG (if you want to keep or change your file name it is up to you )
  •  so your PDF file become an image file . So you can upload your PDF file as you upload your image. See the example of my PDF files that I saved as JPEG (*jpg ,* jpeg , *jpe) at this link.

How to add a Gadget to your blog.

Log into your Dashboard with your account ,click on Design tab
You reach at your dashboard Gadget , click on a Gadget anywhere you want to place:
After clicking on a Gadget you will get many Gadgets from the webs, so you have to select one which you like and click on the Gadget image or Plus sign +
and click at save at Add and Arrange Page Elements.
If you want to edit any gadget , follow the steps above and click on a gadget which you want to edit.  

Friday, December 17, 2010

How to link to another site

How to link to another site (homepage).Please look at the image below :
One : You can link to another site by writing your title and put the homepage address to the link. For example my title of my post is How to link to another site and I fill column link (arrow one ) with http://www.khemarak.blogspot.com/ and click PUBLISH POST.
Two : If you want to link from the word , group of words or phrase in your post , please highlight the word , group of words or phrase that you want to link and click on the link on task bar (as arrow two) and fulfill the homepage address.For example : I give you one word :please visit my blog by clicking on this see the picture
Click OK at Edit link and click on PUBLISH POST

Wednesday, December 15, 2010

How to edit your post ?

When you make your post to publish to the world , there are something wrong in your blog and you want to edit or delete it.
  • Once you've logged into Blogger (your Google account with your own ID as mail address and Password ) you'll see your Dashboard, showing your list of blogs. Like this image
Click the blue 'Edit Posts' button to edit or delete post.You get your dashboard like this :

There are many posts in your dashboard and showing only the titles of your posts ,so you have to decide which one you have to edit or delete . If you want to edit, click on 'Edit' button on the left side .If you want to delete it , click on 'Delete' button on the right side .
And after editing your posts , do not forget to click on 'Publish post' button again.
Note: In this step as second image , sometime you forget to click on 'Publish post' button to publish your posts, so that the word draft appears at the titles of your posts .If you think that these titles are ready to publish , click on 'Publish post' button.If you think these posts are not yet finished and need to continue editing more , keep them in draft until you have finished them and click 'Publish post' button .See the image with draft word that the post is not yet  published.

How to post something to your post

After you got your desired blog template , you got your own blog. Now you want to post something in your blog. Let's go by some steps below:
  • Once you've logged into Blogger (your Google account with your own ID as mail address and Password ) you'll see your Dashboard, showing your list of blogs. Click the blue 'New Post' button to create a new post.
  • Next, you'll see the Create New Post page. Start by giving your post a title (optional) your title's name of your blog , then enter the post itself.
  • When you're done, click the "Preview" link to make sure it's ready to go.Not yet publish only see your draft. If it is OK , go to next step.
  • Once you're satisfied with your post, click the "Publish" button. This will publish your new post to the world. Please look at the image below:
Note: Look at the task bar above , you can make : Undo , Redo , Font , Font size , Bold , Italic , Srikethrough , Text color , Text background color , Add or Remove link , Insert image , Insert Video , Insert jump break , Alignment Numbered list , Bullet list , Quote , Remove formatting , Check spelling ...like this image:
I think you can do all in as Windows or other programs but the main point that you mark are to insert image and insert a video file .This means that you can upload an image or a video file only, you can not upload any document else. If you want to upload other documents except image or video files , you have to find other file hosting web.(Some file hostimg webs are free for you and some charge you).->Next step.

Monday, December 13, 2010

How to upload your Blogger Template to change your blog style

After  you have created your blog , you got your blog in Simple template.Now you want to change your blog style by another template which you had downloaded from http://btemplates.com/   .
or other file hosting. Now you want to upload your template which you like to make your blog attract visitors.Let's go :
1- Sign in your Google Account http://www.blogger.com/
2- You reach your dashboard page and in dashboard you see Manage blog and under this word you can see some tabs , please select Design tab .You got another Dahboard.
3-Select Edit HTML. You got another Dashboard.Note:You will see : Backup / Restore Template and some word like this:
Before editing your template, you may want to save a copy of it.
Download Full Template. Mean that if you do not want to lose your old blog and something in your blog to keep in your computer folder. If you think it is not necessary , no need to download it .
4- Upload a template from a file on your hard drive .Please select browse to reach your template in your file folder that you have download before and select it afterward click on Upload .Wait a moment .
5- After upload finished , some templates can keep all your profiles in the old blog (old template) and some templates can not keep your profiles in your old blog .So some new templates always ask you to keep or delete your old profiles or old thing.If you want to keep your old thing in your old blog , please find Keeping Tab and select it .If you don't want to keep your old thing , please select deleting tab.
6- And/or click save template and view your result.

Sunday, December 12, 2010

BLOGGER TEMPLATES

You can download free blogger templates from http://btemplates.com/ .


What is your blog looks like ?

What is your blog looks like ?Your blog stile is according to your template,so see the images below and find to download these templates at http://btemplates.com/


How to install Khmer Unicode on Galaxy Note N7000

This is my personal use only but I want to share to whom Cambodia people want to use Khmer Unicode on their Galaxy Note .Now let begin: - Y...