This is my personal use only but I want to share to whom Cambodia people want to use Khmer Unicode on their Galaxy Note .Now let begin:
- Your Device must be in rooted;
- Download Khmer Rom Note ICS 4.0.3 zip from Here;
- Copy Khmer Rom Note ICS 4.0.3 zip from to your SD card (Internal or External);
- Reboot your device in ClockWorlMod recovery mode (CWM mode). In this case you have 2 choice to reboot : 1-you can reboot into CWM recovery by using CWM in your device if your device is already rooted.2- you can reboot into recovery by pushing 3 buttons as Power button , Home button and Volume button up (Volume button Up and Down , you have to select UP );
- Navigate to Install zip from SD card and select Khmer Rom Note ICS 4.0.3 zip to flash
you have to wait for 3 or 5 minutes and after finishing in flashing , navigate to reboot system and select it to reboot .When your device reboot , you have to wait for a while until your device fully updates .
- After completely update ,some device you have to Default font at setting .->Setting->Display->
Font style select ->Default font.
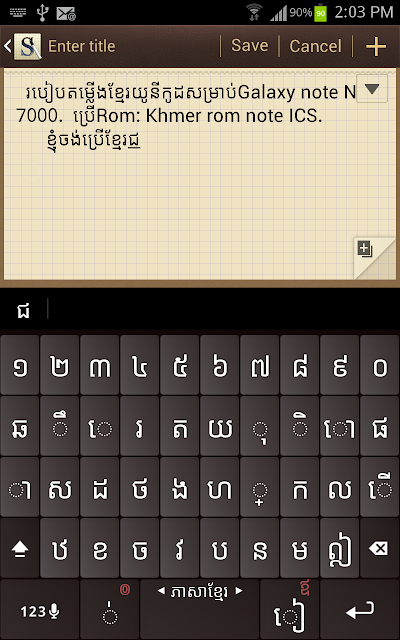
- Download Multiling Keyboard with khmer plugin from play store.
Showing posts with label HOW TO. Show all posts
Wednesday, September 26, 2012
Friday, February 4, 2011
How to make text in transparent box
See the image with text box:
How to do it:
How to do it:
- Create your image background using your image link with CSS . You create a div element (class="background") with a fixed height and width, a background image, and a border.
- Then you create a smaller div (class="transbox") inside the first div element. This div also have a fixed width, a background-color, and a border.
<style type="text/css">
div.background
{
width:200px;
height:140px;
background:url(http://dc268.4shared.com/img/K82dxZYV/1_online.jpg) repeat;
border:2px solid black;
}
div.transbox
{
width:130px;
height:100px;
margin:10px 30px;
background-color:#ffffff;
border:1px solid black;
filter:alpha(opacity=60);
opacity:0.6;
}
div.transbox p
{
margin:10px 20px;
font-weight:bold;
color:#000000;
}
</style>
All the red ones you can change by yourseft to make fitting or suiting your image background and text box.
- Make Div class of Background and Transbox , and insert your text inside transparent box in body.
<div class="background">
<div class="transbox">
<p>You type your tex here.
</p>
</div>
</div>
<div class="transbox">
<p>You type your tex here.
</p>
</div>
</div>
How to create a transparent image
First look at the two images below:
Normal image:
A transparent image:

Normal image:
A transparent image:
The code source for Normal image :
Saturday, January 22, 2011
How to make recent comment
Recent comment in (blogger) is something that you or your visitors express opinion of something on your blog .
For myself , I have two methods to make recent comment on my blog :
1- Use a Gadget from Blog buster.2- Use the Script code .
1- Use a Gadget from Blog buster :
- Log in to your Account with your ID -> Dashboard ;
- Select a Gadget in wherever you like ( Sidebar Gadget , Buttom Gadget ...).
- Find the Gadget Recent Comment and select it .-> save your template. See the image :
2- Use the Script code :
- Log in to your Account with your ID -> Dashboard ;- Select a Gadget in wherever you like ( Sidebar Gadget , Buttom Gadget ...).
- Copy the code below to paste in your Gadget by selecting HTML code/Javascript box .
Note: In the script code that you have copied to paste in your html code , you must change my blog name to your own blog . So you have to find the code below and change it (with red name).You can find this code at the buttom of the script code .Please change
withoutit-learnblog to your own blog .
Sunday, January 16, 2011
How to split header to 2
Sometimes you want to design your template blog.Now I want to make the blog Header into 2 column as the picture .
Follow the below steps:
1- Find the code ]]></b:skin>
2- Copy the code below to paste exactly above ]]></b:skin>.
Follow the below steps:
1- Find the code ]]></b:skin>
2- Copy the code below to paste exactly above ]]></b:skin>.
How to make related post with thumbnails
Related posts with thumbnails are the posts that display the thumbnails with summary text under every post selected in the same label.And when visitors visit your posts , they are shown under that post to relate to the same label.The step to make ralated posts with thumbnails:
1- Log in your account to Dashboard -> Edit HTML and check the "Expand Widget Templates" check box.
2- Find the code </head>.
3- Copy the code below to paste before </head>.
Saturday, January 15, 2011
How to make scrolling text box with links
Look at the scrolling text box image and you can click on the box bar to select the title from the box that I use with URL links.
how to make drop down scroll
Drop down scroll menu (Navigation) is the navigation contains many links with topic menu and use one line space in blog. And visitors click on it , it shows many topic links to select. Look at my Drop-down scroll menu.
Tuesday, January 11, 2011
How to put time and date script
I am sorry , I have no knowledge about this , just copy the below code to paste in your blog .
<script language=Javascript1.2>
<!--
var tags_before_clock = "<b>It is now "
var tags_middle_clock = "on"
var tags_after_clock = "</b>"
if(navigator.appName == "Netscape") {
document.write('<layer id="clock"></layer><br>');
}
if (navigator.appVersion.indexOf("MSIE") != -1){
document.write('<span id="clock"></span>');
}
DaysofWeek = new Array()
DaysofWeek[0]="Sunday"
DaysofWeek[1]="Monday"
DaysofWeek[2]="Tuesday"
DaysofWeek[3]="Wednesday"
DaysofWeek[4]="Thursday"
DaysofWeek[5]="Friday"
DaysofWeek[6]="Saturday"
Months = new Array()
Months[0]="January"
Months[1]="February"
Months[2]="March"
Months[3]="April"
Months[4]="May"
Months[5]="June"
Months[6]="July"
Months[7]="August"
Months[8]="September"
Months[9]="October"
Months[10]="November"
Months[11]="December"
function upclock(){
var dte = new Date();
var hrs = dte.getHours();
var min = dte.getMinutes();
var sec = dte.getSeconds();
var day = DaysofWeek[dte.getDay()]
var date = dte.getDate()
var month = Months[dte.getMonth()]
var year = dte.getFullYear()
var col = ":";
var spc = " ";
var com = ",";
var apm;
if (date == 1 || date == 21 || date == 31)
{ender = "<sup>st</sup>"}
else
if (date == 2 || date == 22)
{ender = "<sup>nd</sup>"}
else
if (date == 3 || date == 23)
{ender = "<sup>rd</sup>"}
else
{ender = "<sup>th</sup>"}
if (12 < hrs) {
apm="<font size='-1'>pm</font>";
hrs-=12;
}
else {
apm="<font size='-1'>am</font>";
}
if (hrs == 0) hrs=12;
if (hrs<=9) hrs="0"+hrs;
if (min<=9) min="0"+min;
if (sec<=9) sec="0"+sec;
if(navigator.appName == "Netscape") {
document.clock.document.write(tags_before_clock+hrs+col+min+col+sec+apm+spc+tags_middle_clock+
spc+day+com+spc+date+ender+spc+month+com+spc+year+
tags_after_clock);
document.clock.document.close();
}
if (navigator.appVersion.indexOf("MSIE") != -1){
clock.innerHTML = tags_before_clock+hrs+col+min+col+sec+apm+spc+tags_middle_clock+
spc+day+com+spc+date+ender+spc+month+com+spc+year+tags_after_
clock;}
}
setInterval("upclock()",1000);
//-->
</script>
Please Select on Highlight All and then Click on Copy to Clipboard
Monday, January 10, 2011
How to make text area
What is the text area ? . The text area is the area or place that we can save html code or words for visitors can copy them to paste in their blogs or in blog Gadgets. Now I show one html code that the viewers can select (Highlight) and copy to the clipboard.Look at the script and code below :
<script type="text/javascript">
function CopyToClipboard()
{
CopiedTxt = document.selection.createRange();
function CopyToClipboard()
{
CopiedTxt = document.selection.createRange();
CopiedTxt.execCommand("Copy");
}
</script>
<div>
<form name="copy">
<div align="left">
<span style="color: blue; font-weight: bold;"><b>
<i>Please Select on Highlight All and then Click on Copy to Clipboard</i></b></span>
<input onclick="javascript:this.form.txt.focus();
this.form.txt.select();" type="button" value="Highlight All" />
<input onclick="CopyToClipboard()" type="button" value="Copy to clipboard" /> </div>
<div align="left">
</div>
<div align="left">
<textarea cols="55" name="txt" rows="100" style="height: 100px; width: 600px;">
Insert your text or html code here </textarea></div>
</form>
</div>
The red ones you can change to your purpose to suit your blog template .This is an example image for text area .
</div>
The red ones you can change to your purpose to suit your blog template .This is an example image for text area .
- How to make it : Copy the html code below to paste in your post or in your Gadget , but be careful , when you want to paste the html code to your new post , you have to select Edit HTML Do not select Compose in your new post.
Saturday, January 8, 2011
How to make carousel in blog
Carousel in blog displayed as flash images or slideshow in blog.There are many styles of carousel displaying in blog.Now I make one style (Horizonal style) in blog. Let's follow some steps below :
1- Log in your account directly to your Dashboard ( Do not forget to download your full template first to keep in your folder computer).
2- Find the code ]]></b:skin> ( Use Ctrl and F on your keyboard computer to find this code by typing this code in X Find area).3- Copy the CSS code below to past before the code ]]></b:skin> .
Please Select on Highlight All and then Click on Copy to Clipboard
4- As step 2 find the code </head> .
5- Copy the script below to paste exactly before the code </head> .
Note: If your template already has had jQuery 1.2.6 - New Wave Javascript , please delete it from your temp late .
Please Select on Highlight All and then Click on Copy to Clipboard
7- After finding the best Gadget for your carousel displaying , please copy the html code beloww to put in your best javascript/html box .
Please Select on Highlight All and then Click on Copy to Clipboard
SEE MY CAROUSEL AT THE BUTTOM OF THIS BLOG.
Friday, January 7, 2011
How to make slideshow menu in blog
Slideshow menu tabs are always used in magazin templates at the head of blog .Slideshow tab menu is a widget that provides you a multiple tab of menu in one simple page. By adding this Slideshow tab menu , will attract your visitors easily to view your blog . Look at the method below "How to make slideshow menu in blog":
- Log in your account to Dashboard ;
- Go to Edit HTML by clicking on Design .At this time you have to download your old template first by selecting on "Download full template to keep in your folder computer (recommeded on your desktop , it is to find to upload your old template , if something wrong in your new template).
- Find the code ]]></b:skin> . The easy way to find this code in your template , you have to press Ctrl and F on your computer keyboard .
- Copy the code below to place before ]]></b:skin> .
- Find the code </head> and copy the the script below to put before it (</head> ).
- Save your template
- Now it is time to find the place for your slideshow tab menu. You can place your slideshow tab menu in anywhere you like as in your new post , your left or right sidebar , top .. , or you want to place in any blog's Gadget of your template blog. Please copy the html code below to place in anywhere you prefer.
- Click save your template and view your blog.
Please Select on Highlight All and then Click on Copy to Clipboard
Note: If you want to edit or change anything of your slideshow tab menue , you can edit or change something as width , name , Link .... in the html code at step 7 .
Look at my example below :

how to upload some documents to your blog
You can make your free blog and you don't want to pay any charge to file hosting websites and you want to keep some documents as from word , excel , PDF files in your free blog. [...]
How to upload files to file hosting web
Now you want to upload files to file hosting webpages. You can upload any file to file hosting webs with free . [...]
How to Log in and upload files at 4sharded.com
At the previous tutorial , I suppose you had made the 4shared account successfully . In this tutorial method .[...]
How to get the URL , HTML code and Forum code to link to your blog
At the previous step you have known about uploading the files to 4shared.com , now you want to get the URL , . [...]
Subscribe to:
Posts (Atom)
How to install Khmer Unicode on Galaxy Note N7000
This is my personal use only but I want to share to whom Cambodia people want to use Khmer Unicode on their Galaxy Note .Now let begin: - Y...

-
At the previous step you have known about uploading the files to 4shared.com , now you want to get the URL , HTML code and forum code to pa...
-
When you make your post to publish to the world , there are something wrong in your blog and you want to edit or delete it. Once you've ...
-
After you got your desired blog template , you got your own blog. Now you want to post something in your blog. Let's go by some steps b...